Party Planner User Guide

February 20, 2024 at 9:19 AMAdministrator

Meet Party Planner, the perfect partner for creating unforgettable parties and events. With its intuitive interface and comprehensive functionality, this all-in-one tool simplifies your planning process. Featuring six user-friendly sections—"TO DO", "Guests", "Food", "Shopping", "Budget" and "Misc" —alongside essential information, Party Planner equips you with a wealth of powerful features.

Designed to enhance your planning experience, Party Planner seamlessly organizes your tasks and responsibilities. The "TO DO" section automatically prioritizes your action items, ensuring you never miss a beat.

Effortlessly manage your guests with the "Guests" section, as you import contacts and keep communication within the app. Track RSVPs and maintain a seamless connection with your attendees through quick call and email access.

The "Menu" section transforms your culinary vision into a reality. Plan your menu, assign to-do tasks and shopping items to each dish, and effortlessly create a synchronized to-do and shopping list. Discover new recipes from the web, save them for future reference, and infuse your event with gastronomic delights.

Track your finances with ease using the "Budget" section. Monitor expenses, set spending limits, and maintain a clear overview of your event's financial landscape.

To expedite your planning process further, Party Planner allows you to create similar events by importing items from existing ones. This time-saving feature eliminates the need to start from scratch, empowering you to effortlessly organize multiple events.

With Party Planner, you can elevate your event planning game to new heights. Experience the convenience, efficiency, and organization it brings to every aspect of your party or event preparation.

Key Features:

    • Sorted to-do list shows how long until event date/time for easy planning

    • Import guests from contacts and quick call/email access within the app

    • Assign to-do, shopping items and guests when planning the menu

    • Create similar event by importing from existing events

    • Data are automatically synced to the cloud so it can be accessed from multiple devices

    • Share lists between users

   
Notes for the old My Party Planner app users:
You can also migrate your lists from the old app to the new app. Please see “Backup and Restore” section below for more detail.

Login/Sign up

To login/Sign up, click “LOGIN/SIGN UP” button the top right of the home screen. You can sign in with Google/Apple or sign up using email/password.
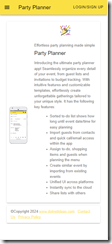
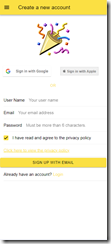
image image

Creating New List

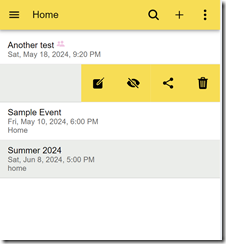
To create a new list, click the “+” icon on top right of the Home screen. It will prompt you to enter the event name.

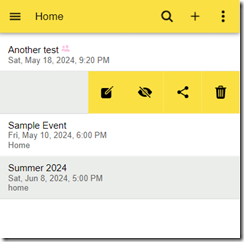
To see the options for an event, swipe the event name to the left. There are options for editing the event, changing the event status, deleting the event or sharing the event. We will explain the event sharing feature later in this guide.
 

Edit Event

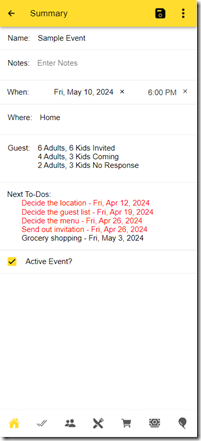
Once an event is created, it will automatically send you to the detailed view of the event. The event detail view has 7 tabs. They are “Home”, “TO DOs", "Guests”, "Food”, "Shopping”, "Budget" and "Misc" The first one is the event header. It displays the summary of the event. You can add note, change the event date/time and set the location.
 

In all the tabs besides the “Home” tab, you can add, edit and delete items.

To add a new item, click on "+" at the top right of the screen. It will open the item detail view.

You can also add multiple items at a time by clicking on the floating icon at the bottom of the screen, then the list icon.

To edit or delete an existing item, swipe item to the left. Then click on edit icon or trash can icon.

Edit To-dos

The To-dos tab displays to-do items sorted by due date/time. If a to-do is for a dish, the name of the dish will be displayed along with due date. It also displays how long it is until the event date/time.
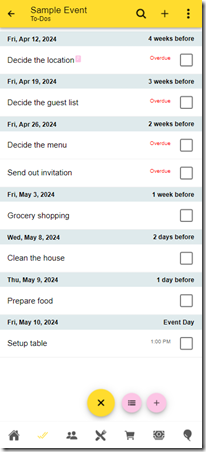
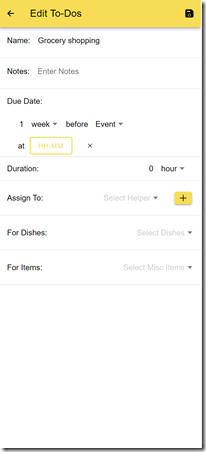
To add a new to-do, click on "+". The item detail view will show up. User can enter name, due date (in format of how long until event date/time or another to-do task), notes and etc.

You can also enter start time in addition to due date/time. "Start Time" is the time of a day this item needs to be started. It is not required. But if you do set it, then you can't set the relative due date/time to number of hours or minutes.

For example, if you have event/party date time set to June 15th, 2014 at 6pm, below shows you how the item's due date/time is calculated based on user input.

Due Date/Time Start Time Calculated Due Date/Time
2 weeks   June 1st, 2014
3 days   June 12th, 2014
3 days 7pm June 12th, 2014 at 7pm
5 hours   June 15th, 2014 at 1pm
45 minutes   June 15th, 2014 at 5:15pm
0 hours 5:30pm June 15th, 2014 at 5:30pm


Due date/time, start time and duration can also be edited by click on the due date/time display on the right side of each item.

You can assign helper to a task. Just choose a helper from the drop down list under "Assign To". To edit helpers, see the “Edit Metadata” section below.

To hide/show completed to-dos, click on the 3 dot menu and then “Hide/Show checked items"


Edit Guests

Guest tab displays guest list sorted by name. It also shows how many adults and kids under each guest and RSVP info.
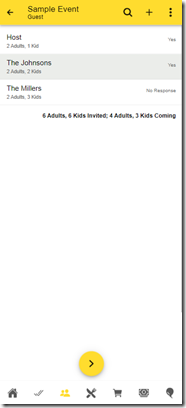
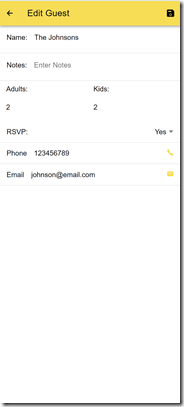
 

To add a new guest, click on "+". The item detail view will show up. You can enter name, phone number, email, number of adults and kids under each guest, RSVP and notes. There are call and email buttons for quick call and emailing to the guest.

You can also import from contacts on the device by clicking on the 3-dot menu and then select “Import From Contacts”.

Edit Food Items

Food tab displays menu for the event. It also shows to-do items if there are any. Clicking on browser icon opens up web browser view for quick look up of recipe if recipe URL is saved for the dish.
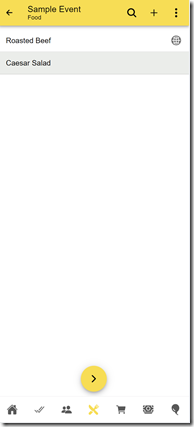
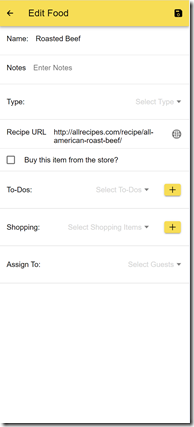
 

To add a new dish, click on "+". The item detail view will show up. User can enter name, type and notes. User can also add shopping items and to-do items for the dish or assign a dish to guests. There is a quick access button to automatically search recipe on the Internet for this dish. User can save the URL for future reference.

Edit Shopping Items

Shopping tab displays shopping list for the event. It also shows the dishes if a item is for particular dishes.
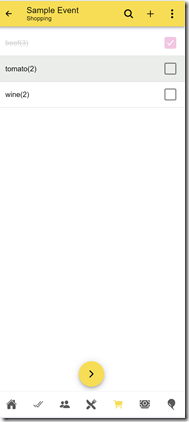
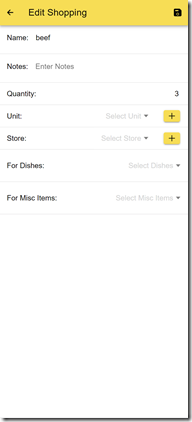
To add a new shopping item, click on "+". The item detail view will show up. User can enter name, quantity, unit, notes and dishes.

To hide/show completed to-dos, click on the 3 dot menu and then “Hide/Show checked items"


Edit Budget Items

Budget tab displays estimated and actual costs for the event. You can enter either total costs or cost per person. If you enter cost per person, the app will automatically calculate the total costs by following rules:

total estimated costs = estimated cost per adult * number of total adults invited + estimated cost per kids * number of total kids invited

total actual costs = actual cost per adult * number of total adult coming + actual cost per kids * number of total kids coming
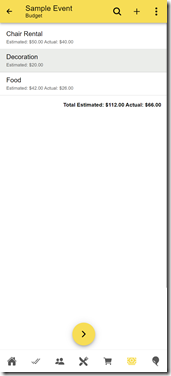
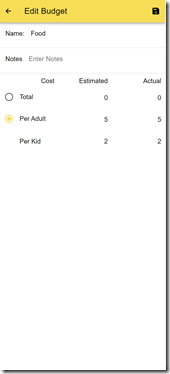
 

To add a new budget item, click on "+". The item detail view will show up. User can enter name, estimated costs, actual costs, and notes.


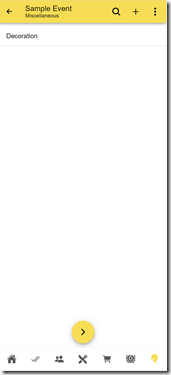
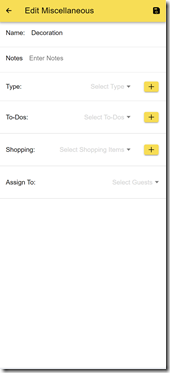
Edit Miscellaneous Items


Import From Other Events

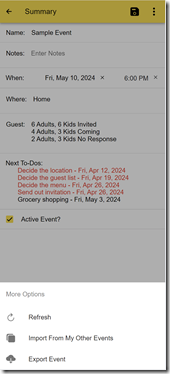
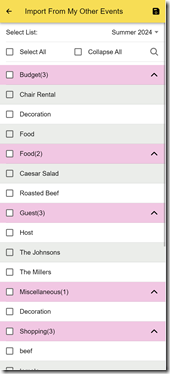
To import items from any of your events, open the event you are currently working on, click on the 3 dots icon on the top right. Then select “Import from my other events” from the popup menu. It will open the import view. Select an event, pick the items you want and click on the save icon on the top right corner.
 

Edit Metadata

To edit metadata such as the helpers, unit, store and other metadata, click on the menu icon on the top left and then select “Metadata” from the menu. Then you can choose the metadata type from the drop down and start editing them. If you delete a metadata, the value will be cleared from all the items associated with that metadata.


Export Event

To export an event, open home tab of the event and click on the 3 dots menu icon and then “Export Event” from the popup menu. You can then choose to text, email or save the items in plain text format using preferred apps.


Share Lists Between Users

To share a list with another user, swipe the list name to the left and click on the share icon.

Then click on the “+” icon on the top right to enter the email address of another registered user.


An invitation will be sent to the other user. He/She will receive a notification on the “Account” tab in the app. They can choose to accept or delete the invitation. Once the user accepts the invitation, he/she will be able to see your list under his/her login. You can stop list sharing by delete the user from the “Share List With” view.


Backup and Restore(or Migration)

To backup and restore a list, click on the menu on the top left and then select “Backup & Restore” from the menu. It will save the lists to the local storage on your browser or device.

On an Android device, if you have the previous My Party Planner app(lite or full) installed, the new app will display the button “Migrate From My Party Planner” to allow you to migrate your lists from those apps.


For Android 10 and below, the app will try to navigate to the list folder the My Party Planner(lite or full) is using. You should see the following screen after clicking on “Migrate From My Party Planner” button. You can then click on the list you want to migrate and click on “Select” button on the top right to select the list.

For Android 11 and above, you will have to first use the “Backup and Restore” feature in the old My Party Planner app to backup your lists to a folder which can be accessed by the new Party Planner app. It is recommended to save your lists to the “Documents” or “Download” folder. When you click on the “Migrate From My Party Planner” button, it will open the file picker which should look like the screenshot below. You can then navigate to the folder containing the backup and select the list file you want to migrate.

After selecting the file, you will be prompted to check the content and then click on the “Confirm” button to complete the migration.

You can also select multiple files and migrate them at once.

Sometimes if you don’t see your lists after the migration, you might need to kill and restart the app.

Account View

To edit user preferences, sign out or delete the account, click on the menu on the top left and then select “Account” from the menu. In the preferences section, you can enable dark theme, switch the weight unit and etc.

Please note, if you want to delete your account, you will be prompt to sign out and sign in again to refresh the credential.


Offline Mode

The app allows usage without an internet connection, with certain limitations. Any modifications made are saved locally and synchronized once the device regains online connectivity.


Where To Find the Apps

Web Site:

https://partyplanner.dotnetideas.com

Google Play Store:

https://play.google.com/store/apps/details?id=com.dotnetideas.partyplanner

Apple App Store:

https://apps.apple.com/us/app/party-planner/id6497567947

Contact Us


Please feel free to contact us at support@dotnetideas.com if you have any questions or feedback. Thank you!

Posted in: Party Planner | User Guide

Can I do manual sorting in Packing List 2?

January 10, 2024 at 3:55 PMAdministrator

Unfortunately, manual rearrangement of categories and items in this new app is not supported. They are sorted alphabetically by default. However, a workaround is available to prioritize specific categories or items. Simply add a number prefix to their names, and they will be displayed at the top. While this solution may not provide full flexibility, it offers a practical way to achieve a desired order within the app's limitations. We appreciate your understanding and value your feedback as we continue to improve our app.

Posted in: FAQ

● Why can’t I login to Opus–Task Helper or Packing List 2 using my existing account?

January 9, 2024 at 6:06 PMAdministrator

Opus – Task Helper and Packing List 2 are the revamped edition of the original Chore Checklist and Packing List apps. Please note that they utilize a different cloud service, requiring users to create a new account.

As a thank you to previous users of the paid version of Chore Checklist and Packing List, registering with the new apps automatically removes Ads. Additionally, we offer a seamless data migration process from the old apps to the new ones. Learn how to migrate your data by watching our video tutorial on YouTube. Ensure a smooth transition to the improved versions of our apps with these helpful steps. This tutorial is for migrating the packing lists, but the process is similar for migrating the chore checklists.

Posted in: FAQ

Meal Planner

September 30, 2023 at 3:19 PMAdministrator

Meal Planner is an intuitive meal planning app designed to simplify your kitchen routines and nourish your body and mind. With its thoughtful features, Meal Planner integrates meal planning, inventory tracking, and shopping list generation. It empowers you to effortlessly plan, organize, and optimize your meals like never before.

Please note: this app is not a recipe app. You are responsible to enter your dishes to be used in the meal planning.

Key Features:

Integrated Inventory List: Stay grounded with Meal Planner's integrated inventory list. It keeps track of your pantry essentials, ensuring you have a clear view of what's available, so you can make the most of your ingredients without any waste.

Visual Indicator of Inventory Level: Meal Planner gracefully illuminates your inventory levels with visual indicators. A simple glance reveals which items need attention, guiding you towards mindful choices and preventing those last-minute pantry surprises.

Easy Generation of Shopping List from Inventory List: Planning your grocery shopping has never been easier. Meal Planner enables you to effortlessly generate a comprehensive shopping list based on your inventory. By analyzing the recipes you intend to prepare and cross-referencing them with your current stock, the app identifies the exact ingredients you need to purchase, saving you time and effort.

Update Inventory List from Shopping List: Meal Planner simplifies the process of updating your inventory list after a grocery run. With a simple click, the app will update your inventory, ensuring accuracy and minimizing duplication.

Easy Meal Planning with Drag-and-Drop: Unlike other meal planning app, this app give you full control of how you want to plan your meals. It lets you enter dishes with key ingredients from your inventory. Then it provides a curated list of recommended dishes based on the inventory. By simply dragging and dropping these dishes onto your desired days, you can create a customized meal plan that perfectly suits your tastes and dietary preferences. Please note: this feature works best on a device with bigger screen, such as a tablet or PC.

Meal Planner invites you to embrace a mindful and nourishing approach to meal planning. Let it be your gentle guide, helping you reduce waste, maximize ingredients, and bring harmony to your kitchen. Download Meal Planner today and embark on a humble journey towards nourishment, one meal at a time.

Posted in: Meal Planner

Meal Planner User Guide

September 30, 2023 at 8:04 AMAdministrator

Meal Planner is an intuitive meal planning app designed to simplify your kitchen routines and nourish your body and mind. With its thoughtful features, Meal Planner integrates meal planning, inventory tracking, and shopping list generation. It empowers you to effortlessly plan, organize, and optimize your meals like never before.

Please note: this app is not a recipe app. You are responsible to enter your dishes to be used in the meal planning.

Key Features:
  • Integrated Inventory List: Stay grounded with Meal Planner's integrated inventory list. It keeps track of your pantry essentials, ensuring you have a clear view of what's available, so you can make the most of your ingredients without any waste.
  • Visual Indicator of Inventory Level: Meal Planner gracefully illuminates your inventory levels with visual indicators. A simple glance reveals which items need attention, guiding you towards mindful choices and preventing those last-minute pantry surprises.
  • Easy Generation of Shopping List from Inventory List: Planning your grocery shopping has never been easier. Meal Planner enables you to effortlessly generate a comprehensive shopping list based on your inventory. By analyzing the recipes you intend to prepare and cross-referencing them with your current stock, the app identifies the exact ingredients you need to purchase, saving you time and effort.
  • Update Inventory List from Shopping List: Meal Planner simplifies the process of updating your inventory list after a grocery run. With a simple click, the app will update your inventory, ensuring accuracy and minimizing duplication.
  • Easy Meal Planning with Drag-and-Drop: Unlike other meal planning app, this app give you full control of how you want to plan your meals. It lets you enter dishes with key ingredients from your inventory. Then it provides a curated list of recommended dishes based on the inventory. By simply dragging and dropping these dishes onto your desired days, you can create a customized meal plan that perfectly suits your tastes and dietary preferences. Please note: this feature works best on a device with bigger screen, such as a tablet or PC.

Meal Planner invites you to embrace a mindful and nourishing approach to meal planning. Let it be your gentle guide, helping you reduce waste, maximize ingredients, and bring harmony to your kitchen. Download Meal Planner today and embark on a humble journey towards nourishment, one meal at a time.

Notes for the old Grocery Helper app users:

You will need to register a new account in Meal Planner. If you have the original "Grocery Helper - full" installed on your current device, the Ads in this app will be automatically removed after account registration. You can also migrate your lists from the old app to the new app. Please see “Backup and Restore” section below for more detail.

Login/Sign up

To login/Sign up, click “LOGIN/SIGN UP” button the top right of the home screen. You can sign in with Google/Apple or sign up using email/password.

image  image

Once you signed up, the app will create some sample data for you.

The home screen has 3 tabs: Meal Planner, Inventory List and Shopping List. The default tab is “"Inventory List”. However, you can change it in “Account” view.

 image  image image


Inventory List


Add New Item

To add a new item to the inventory List, click on “+” icon on the top right. You can also click on the “+” on the right of the category name to add an item to that category.

image  image

"Name" and "Category" are required fields. You can select a category from the drop down or add a new one by clicking on the “+” icon on the right.

Import Items

To import items from preloaded templates, click on the 3 dots icon on the top right. Then select "Import from templates" from the popup menu. It will open the import view. Select a language, pick the items you want and click on the save icon on the top right corner.

image  image

Edit Items

To edit an existing item, swipe the item name to the left. There are options to edit the item, make the item active/inactive, and delete the item.

image  image

The item detail view allows to enter notes, edit quantities, units, location, stores, expiration date and price history.

Edit Inventory Level

To edit the inventory level, click on the inventory level icon on the right of an item. You can then select the level by press one of the icon. From left to right, the icons represent full, near full, half full, near empty or empty. To select the icon for shopping list, press the shopping cart icon. To close the view, click anywhere outside the popup or click on the “X” icon on the right.

image

Mass Change

To make changes on multiple items, click on the 3 dots menu icon and then “Mass Change” from the popup menu. It will display items you are able to edit. You will select the items you want to change, then click on the image icon on the top right to enter the values. You can also delete multiple items here by clicking on the trash bin icon on the top right.

image  image

Shopping List


Add New Item

There are several ways to add an item to the shopping list. You can check the “On Shopping List” checkbox in the item detail view. You can also click on the shopping cart icon when edit the inventory level of an item. Or you can click on the “+” icon in the shopping list view. As you start typing in the “Search Inventory” box, matching items from the inventory list will show up. You can then add them to the shopping list. You can also add brand new item by click on “NEW ITEM” on the left.

image image  image


Edit Items

To edit an existing item, swipe the item name to the left. There are options to edit the item and delete the item.

image  image


Check Off Items

When check off an item in the shopping list view, you can choose to “Show Price Popup” or not. You can temporarily turn it on by click on the 3 dot menu on the top right and then click on “Show Price Popup” or go to Account view and change the switch there.

The price popup view will allow you to enter price for an item. The app will store latest 5 prices you entered. Once it is entered. a price tag icon will show up on the item. You can see the price history popup when you click on the price tag icon. To edit or delete a price, swipe the price to the left and click on the edit or delete icon.

image  image  image


Update Inventory List

As you check off items in the shopping list, you can click on the 3 dot icon on the top right and click on “Update Inventory” from the popup menu. It will update the inventory level for that item in the inventory list and remove the item from the shopping list.

image

Export List

To email, text or share the shopping list with other people, click on the 3 dot icon on the top right and click on “Export List” from the popup menu. You can then select from the share-enabled apps(i.e. message or email) to share the shopping list.

Meal Planner

By default, the meal planner shows the read-only view. Click on the red floating edit icon at the bottom right of the screen to start planning the meals.

The edit view will display the current week, ingredients in stock and recommended dishes based on the ingredients in stock. You can drag-drop the recommended dishes to the planner. You can also move the dishes between meals and days. It is the best to use the edit view on a tablet or PC so you can easily drag/drop dishes.

image  image


Edit Dishes

You will need to establish a dish list first in order to plan the meals. To edit dishes, click on the menu icon on the top left and choose “Dishes” from the menu.

To add a new dish, click on the “+” icon on the top right of the dish list view. You can enter name and notes; add tags and ingredients; or add the URL of your favorite recipe.

To add/edit ingredients, click on the image icon. It will load all the inventory items with “Is For Meal Planner” checked. You can then select the ingredients for this dish. We recommend that you only select the main ingredients for the dishes because the selected ingredients will be used in the meal planning. When the ingredient is in stock, the dishes containing that ingredient will be displayed under the “Recommended Dishes”.

When click on the image icon, the app will open the recipe in the default web browser.

image  image


Plan Meals

image

To plan the meal for current week, you click on the image icon on the right of each meal and then select the dishes from the meal detail view. You can also drag a dish from the recommended dishes panel and drop it on top of a meal. In the meal detail view, you may add new dishes or enter notes.

If a ingredient is not in stock, it will be showed in the “Ingredients Not In Stock” section. Click on image will add those items to the shopping list.

To switch current week you are editing, click the “<” and “>” icon on the top right of the view

image


Other Features


Edit Metadata

To edit metadata such as the categories, units, location and stores, click on the menu icon on the top left and then select “Metadata” from the menu. Then you can choose the metadata type from the drop down and start editing them. If you delete a metadata, the value will be cleared from all the items associated with that metadata. To change the order of  categories, click on the image icon on the top right. It will enter reorder mode. You can then press the icon on the right and drag them around.

image  image image


Share Lists Between Users

To share your list set with another user, click on the menu icon on the top left and click on “Account” to go to the account view. Then click on the “+” icon on the left of “Share List With”. Enter the email address you want to share the list with. An invitation will be sent to that user.

The user should see “Pending Invitations” in his/her account view. Once the user accepts the invitation, the list set name will show up under the “Default List Set” section. The user can then switch between the list sets.

image  image  image

You can stop list sharing by delete the user from the “Share List With” section.


Backup and Restore(or Migration)

To backup and restore a list, click on the menu on the top left and then select “Backup & Restore” from the menu. It will save the lists to the local storage on your browser or device. On Android or iPhone, your data will be saved to the “Document” folder under “Internal storage”.

image

On an Android device, if you have the previous Grocery Helper app(lite or full) installed, the new app will display the button “Migrate From Grocery Helper” to allow you to migrate your lists from those apps.

image

You will need to first use the “Backup and Restore” feature in the old Grocery Helper app to backup your lists to a folder which can be accessed by the new Meal Planner app. It is recommended to save your lists to the “Documents” or “Download” folder. When you click on the “Migrate From Grocery Helper” button, it will open the file picker which should look like the screenshot below. You can then navigate to the folder containing the backup and select the list file you want to migrate.

Please note: it will only migrate your inventory lists, not the shopping lists. You don’t need to migrate any system lists.

image

After selecting the file, you will be prompted to check the content and then click on the “Confirm” button to complete the migration.

image

Sometimes if you don’t see your list after the migration, you might need to kill and restart the app.

Account View

To edit user preferences, sign out or delete the account, click on the menu on the top left and then select “Account” from the menu. In the preferences section, you can enable dark theme, select default tab, show price popup and etc..

image

Please note, if you want to delete your account, you will be prompt to sign out and sign in again to refresh the credential.

Where To Find the Apps

Web Site:

https://mealplanner.dotnetideas.com

Google Play Store:

https://play.google.com/store/apps/details?id=com.dotnetideas.mealplanner

Apple App Store:

https://apps.apple.com/us/app/meal-planner/id6480026648

Contact Us

Please feel free to contact us at support@dotnetideas.com if you have any questions or feedback. Thank you!

Posted in: Meal Planner

Opus–Task Helper

August 5, 2023 at 3:02 PMAdministrator

Opus - Task Helper is an intuitive task management app that aims to streamline your task management experience at home or any other location. With its user-friendly features and enhanced functionality, Opus simplifies task tracking and helps you stay on schedule.

Key Features:

Efficient Task Tracking

Opus records the completion date of each task and calculates the next due date based on your preferences. Say goodbye to missed deadlines and confusion, and stay on top of your responsibilities effortlessly.

Automatic Reset

Enjoy a fresh start for recurring chores with Opus' automatic reset feature. Daily chores reset after midnight (or any hour you specify in "Preferences"). For weekly, monthly, or other recurring tasks, progress is reset based on customizable conditions for optimal efficiency. Check out the "Automatic Reset" section in the Help menu for more details.

Customizable Task Details

Tailor each chore to your specific requirements. Opus allows you to set start/end dates, reminders, progress tracking, and notes for every task. Personalize your tasks to suit your unique preferences and stay organized in your own way.

Multiple List Creation

Create multiple lists within Opus to categorize tasks effectively. Whether it's chores at home, work-related tasks, or special projects, you can effortlessly manage them all in one app. Combine multiple lists in the "Due Date View" to have a comprehensive overview, sorted by due dates, for seamless task management.

Auto Sync

Opus offers the convenience of auto sync, ensuring your task lists are always up to date across multiple devices. With this feature, any changes made to your tasks or lists on one device will automatically sync and reflect on all your connected devices.

Share Lists with Other Users

Collaboration made easy! Opus enables you to share your task lists with other users, promoting teamwork and shared responsibility. Whether it's managing household chores with family members or coordinating tasks with colleagues, simply invite others to join your list and keep everyone on the same page. Enjoy effortless task delegation, real-time updates, and improved productivity with the ability to collaborate and share lists within the app.

Experience the joy of a well-organized life with Opus - Task Helper. Download now and take control of your tasks like never before!

You can get this app at the following stores:

outofdate-badge    New App Store marketing tools available

You can also access the web version of the app at the following link:

https://opus.dotnetideas.com

Posted in: Opus

Opus–Task Helper User Guide

July 4, 2023 at 1:15 PMAdministrator

Opus - Task Helper is an intuitive task management app that aims to streamline your chore management experience at home or any other location. With its user-friendly features and enhanced functionality, Opus simplifies task tracking and helps you stay on schedule.

Key Features:

  • Efficient Task Tracking: Opus records the completion date of each task and calculates the next due date based on your preferences. Say goodbye to missed deadlines and confusion, and stay on top of your responsibilities effortlessly.
  • Automatic Reset: Enjoy a fresh start for recurring chores with Opus' automatic reset feature. Daily chores reset after midnight (or any hour you specify in "Preferences"). For weekly, monthly, or other recurring tasks, progress is reset based on customizable conditions for optimal efficiency. Check out the "Automatic Reset" section in the Help menu for more details.
  • Customizable Task Details: Tailor each chore to your specific requirements. Opus allows you to set start/end dates, reminders, progress tracking, and notes for every task. Personalize your tasks to suit your unique preferences and stay organized in your own way.
  • Multiple List Creation: Create multiple lists within Opus to categorize tasks effectively. Whether it's chores at home, work-related tasks, or special projects, you can effortlessly manage them all in one app. Combine multiple lists in the "Due Date View" to have a comprehensive overview, sorted by due dates, for seamless task management.
  • Auto Sync: Opus offers the convenience of auto sync, ensuring your task lists are always up to date across multiple devices. With this feature, any changes made to your tasks or lists on one device will automatically sync and reflect on all your connected devices.
  • Share Lists with Other Users: Collaboration made easy! Opus enables you to share your task lists with other users, promoting teamwork and shared responsibility. Whether it's managing household chores with family members or coordinating tasks with colleagues, simply invite others to join your list and keep everyone on the same page. Enjoy effortless task delegation, real-time updates, and improved productivity with the ability to collaborate and share lists within the app.
 
Notes to current Chore Checklist app users:

You will need to register a new account in Opus – Task Helper. If you have the original "Chore Checklist" installed on your current device, the Ads in this app will be automatically removed after account registration. You can migrate your chores from the Chore Checklist app to the new app. Please see the “Backup and Restore” section below for more detail.

Key differences between the old Chore Checklist and Opus

Routines: Routines are no longer available in Opus. Instead, you can assign recurrence intervals at the task level. When migrating existing data, the routine intervals will automatically be moved to the tasks. If you used Routines to group or hide chores, consider reorganizing them into different lists before migrating to Opus.

Editing and Deleting: Opus doesn't have a long-press feature. To edit, delete, or access other options for an item, swipe it to the left and click on one of the icons. For more details, refer to the "Edit/Delete/Skip Task" section below.


Login/Sign up

To login/Sign up, click “LOGIN/SIGN UP” button the top right of the home screen. You can sign in with Google or sign up using email/password.

image  image

Once you are registered, it will automatically create a sample task list for you and take you to the Home screen which is the “Due Date View”.

Home(“Due Date View”)

Once you logged in, the app will open the Home screen which sort the tasks by their due date. Depending on the settings, it may not show all the tasks. For example, it doesn’t show completed daily tasks or one time tasks. This app allows you to create multiple lists. You can choose which lists should be displayed on the home screen. To edit the lists or see all the tasks, click on the edit icon imageon the top right.

When you check off a task, a “Undo” toast will be displayed at the bottom of the screen. When you undo the change, it will reverse the due date and finish date back to what they were before. If you missed the popup, you can go to the “Edit Tasks” view to uncheck the task.

New in 1.1.2, you can now search across all your lists. Click on the 3 dot icon and then select “Search” from the popup menu, it will open the search view.

image image

Create/Edit Task List

In “Edit Tasks” view, you can create a new task list, set default list, change the visibility of a list on the home view, rename or delete a list. You can also share the list with other users.

image  image

Automatic Reset

Daily task will be reset everyday. That is if you checked some items today, they will be unchecked automatically after midnight and advance the due date.

You can change the auto reset time to any hour other than midnight in "Settings". For example, you can set the "Auto-Reset" time to 3am if you don't want the chores to be reset until 3am

By default, non-daily recurring tasks will not auto advance their due date if they are overdue. But you can check the “Reset progress automatically” checkbox if you don’t want them to stay in overdue status.

Finished non-daily recurring tasks will be automatically unchecked based on the following two options

1) Due date is calculated from previous due date

If you finish a task before its due date, then it will be unchecked when the due date is passed;

If you finish a task on its due date, then it will be unchecked when it is half way towards the next due date;

If you finish a task after its due date but choose "Yes" when prompted "If you complete it for previous cycle", then the task also will be unchecked when it is half way towards the next due date.

2) Due date is calculated from completion date

A task will be unchecked when it is half way towards the next due date.


Add New Task

To add a new task, click the image icon on top right of the Home screen.

It will open the task editor and prompt you to enter name and notes. You can configure the reoccurrence for repeating tasks.

image

Notes to the old Chore Checklist users:

The day patterns used to be on the daily chores. Now they have been moved to be under weekly tasks(see the screenshot above)

Edit/Delete/Skip Task

To edit an existing task, swipe the task name to the left or right. There are options to edit the task, skip the next due date, make the task active/inactive and delete the task.

image image[70]  image


When you swipe a task to the left, you will see the following icons:

image  Edit Task. (New in v1.1.5: If you have more than 15 completed active one-time tasks in all your lists, it will display a badge with the count of the tasks on this icon. It is a reminder that it is time to clean them up)

image  Skip the next due date. When skipping a one time task, the system will automatically add one day to the current due date. For example, if it is due today, when you click on the skip icon, it will change the due date to tomorrow.

image  Check off tasks with calendar popup. By default, when you check off a recurring non-daily task, it will popup a calendar for you to pick the completion date. If you don’t want to be prompted, you can turn the “Prompt for completion date” option off in the “Account” view. When you check off a task, it will set the completion date to today automatically. This icon is there in case you do want to pick a different date, you can click on this option button to check off tasks.

image  Delete Task


When you swipe a task to the right, you will see the following icons:

image  Move the item to another list. This icon only show up when you have multiple lists.

image image  Toggle a task’s priority between high and normal

image image  Mark a task as active or inactive


Edit Vacation

Click on the 3 dot icon on the top right and select “Edit Vacation” from the popup menu. It will open the vacation detail view. Enter your vacation start and end dates, and the app will automatically skip your daily tasks during that time.

image  image

Search Lists

To search tasks across all your lists, click on 3 dot icon on the top right and select “Search” from the popup menu. It will open the search view. If you check the “Inactive Tasks Only” checkbox, it will display all the inactive tasks. You can then search tasks among them.

image  image

Export List

You can export tasks from the Home view or the “Edit Task” view. The tasks exported from the Home view will be sorted by the due date. The tasks exported from the “Edit Task” view will be grouped by their recurrence interval. Click on the 3 dot icon on the top right and select “Export List” from the popup menu. It will allow you to text, email or save the tasks in plain text format using preferred apps.

image

Widget(Android Only)

On Android phone, you can add widget to the home screen. It will ask you to sign in the first time when you add it. Once you are signed in, click “Continue”. If you have more than one list, it will prompt you to select one or more lists. Otherwise, it will load the default list and add the widget. You can also enable dark theme for widgets by check the “Dark Theme” checkbox above the “Continue” button.

image image image

In the widget, you can check off tasks and click on the “Refresh” icon on the top left corner to save the changes. You can also press the title bar to open the app. There is shortcut for adding one-time tasks. Click on the “+” icon on the top right corner. It will open the “Add One-time Task” view.

Share Lists Between Users

To share a list with another user, click “Menu”->”Edit/Share List”. Then click the “+” on the right of “List Sharing” label(see the screenshot above). Enter the email address of another registered user.

image

An invitation will be sent to the other user. He/She will receive a notification on the “Account” tab in the app. They can choose to accept or delete the invitation. Once the user accepts the invitation, he/she will be able to see your list under his/her login. You can stop list sharing by delete the user from the “List Sharing” under “Edit/Share List”.

image


Account View

To edit user preferences, sign out or delete the account, click on the image icon on the top left and then select “Account” from the menu. Please note, if you want to delete your account, you will be prompt to sign out and sign in again to refresh the credential.

There are many preference options including enabling dark theme, color customization and other display settings. Please note, the screenshot below maybe outdated as we continue adding more options.

image

Backup and Restore(or Migration)

To backup and restore a list, click on the image on the top left and then select “Backup & Restore” from the menu. It will save the lists to the local storage on your browser or device. On Android or iPhone, your data will be saved to the “Document” folder under “Internal storage”.

image

On an Android device, if you have the previous Chore Checklist app(lite or full) installed, the new app will display the button “Migrate From Chore Checklist” to allow you to migrate your lists from those apps.

image

For Android 10 and below, the app will try to navigate to the list folder the Chore Checklist(lite or full) is using. You should see the following screen after clicking on “Migrate From Chore Checklist” button. You can then click on the list you want to migrate and click on “Select” button on the top right to select the list.

image

For Android 11 and above, you will have to first use the “Backup and Restore” feature in the old Chore Checklist app to backup your lists to a folder which can be accessed by the new Opus app. It is recommended to save your lists to the “Documents” or “Download” folder. When you click on the “Migrate From Chore Checklist” button, it will open the file picker which should look like the screenshot below. You can then navigate to the folder containing the backup and select the list file you want to migrate.

image

After selecting the file, you will be prompted to check the content and then click on the “Confirm” button to complete the migration. You can also select multiple files and migrate them all at one time.

image

Sometimes if you don’t see your list after the migration, you might need to kill and restart the app.

Offline Mode

In version 1.1.0 and above, the app allows usage without an internet connection, with certain limitations. You can edit/add/delete tasks, but not add/delete a list. Certain menu items will also be disabled. On Android devices, when the device is offline, the changes made in a widget will not be synced to the app and vice versa. Any modifications made are saved locally and synchronized once the device regains online connectivity.

Where To Find the Apps

Web Site:

http://opus.dotnetideas.com

Google Play Store:

https://play.google.com/store/apps/details?id=com.dotnetideas.opus

Apple App Store:

https://apps.apple.com/us/app/opus-task-helper/id6450875277

Contact Us

Please feel free to contact us at support@dotnetideas.com if you have any questions or feedback. Thank you!

Packing List 2

January 19, 2023 at 1:53 PMAdministrator

Introducing Packing List 2, the revamped edition of the Packing List by DotNetIdeas. Just like the original Packing List, you can easily create and customize packing lists for any trip, whether you're heading to the beach, hitting the slopes, or jetting off on a business trip.

With a simple and intuitive interface, Packing List 2 allows you to quickly add and remove items from your list, and easily organize them into categories such as clothing, toiletries, and electronics. You can also create multiple lists for different types of trips, and save them for future use.

But that's not all! Packing List 2 also offers helpful features such as group items by luggage or locations, and the ability to share your lists with friends and family. And with automatic syncing across all your devices, you can access your packing lists anytime, anywhere.

Whether you're a frequent flyer or a first-time traveler, Packing List 2 is the perfect tool to help you stay organized and stress-free.

Features:

  • Pre-loaded master templates
  • Create new list from scratch or generate from templates or existing one
  • Support Multiple lists
  • Mass change for easy editing
  • Group by luggage/locations for easy packing
  • Data are automatically synced to the cloud so it can be accessed from multiple devices
  • Share lists between users

Download Packing List 2 today and start packing like a pro!

Posted in: Packing List

Packing List 2 User Guide

July 1, 2022 at 6:31 PMAdministrator
Get organized, pack smart with Packing List 2. Your travel essential.

Introducing Packing List 2, the revamped edition of the Packing List. Just like the original Packing List, you can easily create and customize packing lists for any trip, whether you're heading to the beach, hitting the slopes, or jetting off on a business trip.
With a simple and intuitive interface, Packing List 2 allows you to quickly add and remove items from your list, and easily organize them into categories such as clothing, toiletries, and electronics. You can also create multiple lists for different types of trips, and save them for future use.
But that's not all! Packing List 2 also offers helpful features such as group items by luggage or locations, and the ability to share your lists with friends and family. And with automatic syncing across all your devices, you can access your packing lists anytime, anywhere.
Whether you're a frequent flyer or a first-time traveler, Packing List 2 is the perfect tool to help you stay organized and stress-free.

Features:
    • Pre-loaded master templates
    • Create new list from scratch or generate from templates or existing one
    • Support Multiple lists
    • Mass change for easy editing
    • Group by luggage/locations for easy packing
    • Data are automatically synced to the cloud so it can be accessed from multiple devices
    • Share lists between users
   
Notes for the old Packing List - full app users:
You will need to register a new account in Packing List 2. If you have the original "Packing List - full" installed on your current device, the Ads in this app will be automatically removed after account registration. You can also migrate your lists from the old app to the new app. Please see “Backup and Restore” section below for more detail.

Login/Sign up

To login/Sign up, click “LOGIN/SIGN UP” button the top right of the home screen. You can sign in with Google/Apple or sign up using email/password.

image  image

Creating New List

To create a new list, click the image icon on top right of the Home screen.

image

It will open the list editor and prompt you to enter name, notes, departure/return dates, destinations and flight information. You can also change the list status to be “Active” or not. In the home screen, you can then choose to display active lists only.

image

To see the options for a list, swipe the list name to the left. There are options for editing the list header, checking the flight information or weather, changing the list status, deleting the list or sharing the list. We will explain the list sharing feature later in this guide.

image

Add New Item

Once a list is created, it will automatically send you to the detailed view of the list. You can start adding items by clicking on floating “+” icon at the bottom of the screen or the 3 dots menu icon and then clicking “New Item” from the popup menu. You can also click on the “+” on the right of the category name to add an item to that category.

imageimage  image

"Name" and "Category" are required fields. You can select a category from the drop down or add a new one by clicking on the “+” icon on the right.

To add multiple items at once to a category, click on image icon on the right of the category name and enter the items in the popup dialog.

image

Import Items

To import items from preloaded templates or any of your lists, open the list you are currently working on, click on the 3 dots icon on the top right. Then select "Import from templates" or “Import from my other lists” from the popup menu. It will open the import view. Select a template or list, pick the items you want and click on the save icon on the top right corner.

image  image

You can also import all items from multiple lists. Click on the image icon in the “Import from my other lists” view and select the lists you want to import.

Edit Items

To edit an existing item, swipe the item name to the left. There are options to edit the item, change the quantity of the item, mark the item active/inactive, mark/unmark the item as important and delete the item.

image


Check/Uncheck All and rename category

To check/uncheck all items under a category or rename the category, click on the 3-dot icon on the right of the category name and select the option from the popup menu.

image


Assign Luggage

A new feature introduced in this new app is now allowing nested luggage. You can add luggage containing other luggage. You will have a master list of your luggage. Then each packing list will have its own set of luggage. To edit the master luggage list, see the “Edit Metadata” section.

To assign luggage to a list, click on the 3 dots menu icon and then click “Edit Luggage” from the popup menu. You can add a listed piece of luggage from the master list, rename a luggage, add a nested luggage, delete luggage, or swap luggage. You can move nested luggage from one parent to another or add one luggage to another by dragging/dropping the luggage from its original location to its new parent.

Once you have luggage assigned for a list, a little green luggage icon will be displayed next to all the items. You can simply click on the icon and assign luggage for each item.

image   image   image

Group by Luggage

The items can be group by luggage. To open the group by luggage view, click on the image icon on the top right. Any items with no luggage assigned will be displayed at the bottom under “No Luggage Assigned”. If items has weight assigned, the total weight of a luggage will be calculated when you check off items and displayed under the luggage. If a luggage has weight, it will be added to the total weight as well.

image

Group by Location

The items can also be grouped by locations. Click on the 3 dots menu icon and then click “Group by Location” from the popup menu. Any items with no location assigned will be grouped together at the bottom of the list. You can simply click on each item and pick the location from the popup list.

image

Edit Metadata

To edit metadata such as the categories, luggage and locations, click on the image icon on the top left and then select “Metadata” from the menu. Then you can choose the metadata type from the drop down and start editing them. If you delete a metadata, the value will be cleared from all the items associated with that metadata.

New changes in v1.0.4, you can now assign weight to a luggage. It will be added to the total weight in the group by luggage view.

image  image image


Mass Change

To make changes on multiple items, click on the 3 dots menu icon and then “Mass Change” from the popup menu. It will display items you are able to edit. You will select the items you want to change, then click on the icon on the top right to enter the values. You can also delete multiple items here by clicking on the trash bin icon on the top right.

image  image

Export List

To export the items in a list, click on the 3 dots menu icon and then “Export List” from the popup menu. You can then choose to text, email or save the items in plain text format using preferred apps.

image


Share Lists Between Users

To share a list with another user, swipe the list name to the left and click on the image icon.

image

Then click on the “+” icon on the top right to enter the email address of another registered user.

image   image

An invitation will be sent to the other user. He/She will receive a notification on the “Account” tab in the app. They can choose to accept or delete the invitation. Once the user accepts the invitation, he/she will be able to see your list under his/her login. You can stop list sharing by delete the user from the “Share List With” view.


Backup and Restore(or Migration)

To backup and restore a list, click on the image on the top left and then select “Backup & Restore” from the menu. It will save the lists to the local storage on your browser or device. On Android or iPhone, your data will be saved to the “Document” folder under “Internal storage”.

On an Android device, if you have the previous Packing List app(lite or full) installed, the new app will display the button “Migrate From Packing List” to allow you to migrate your lists from those apps.

Here is a video tutorial on how to migrate your lists.

image  image

For Android 10 and below, the app will try to navigate to the list folder the Packing List(lite or full) is using. You should see the following screen after clicking on “Migrate From Packing List” button. You can then click on the list you want to migrate and click on “Select” button on the top right to select the list.

Screenshot_1677285891

For Android 11 and above, you will have to first use the “Backup and Restore” feature in the old Packing List app to backup your lists to a folder which can be accessed by the new Packing List 2 app. It is recommended to save your lists to the “Documents” or “Download” folder. When you click on the “Migrate From Packing List” button, it will open the file picker which should look like the screenshot below. You can then navigate to the folder containing the backup and select the list file you want to migrate.

Screenshot_1677288709

After selecting the file, you will be prompted to check the content and then click on the “Confirm” button to complete the migration.

Screenshot_1677288967

You can also select multiple files and migrate them at once.

Sometimes if you don’t see your lists after the migration, you might need to kill and restart the app.

Account View

To edit user preferences, sign out or delete the account, click on the image on the top left and then select “Account” from the menu. In the preferences section, you can enable dark theme, switch the weight unit and etc.

Please note, if you want to delete your account, you will be prompt to sign out and sign in again to refresh the credential.

image

Offline Mode

In version 1.1.0 and above, the app allows usage without an internet connection, with certain limitations. Any modifications made are saved locally and synchronized once the device regains online connectivity.


Where To Find the Apps

Web Site:

http://packinglist.dotnetideas.com

Google Play Store:

https://play.google.com/store/apps/details?id=com.dotnetideas.packinglist2

Apple App Store:

https://apps.apple.com/us/app/packing-list-2/id1671080832

Contact Us

Please feel free to contact us at support@dotnetideas.com if you have any questions or feedback. Thank you!

Posted in: Packing List | User Guide

Recent Releases

July 19, 2019 at 4:20 PMAdministrator
Chore Checklist

6/7/2019 - Version 3.3.8

Minor bug fixes in syncing

3/20/2019 - Version 3.3.6

Fix issue with week number being null in monthly chores

2/20/2019 - Version 3.3.5

Fix random notifications showing up for chores with no reminders issue

1/8/2019 - Version 3.3.4

Fix auto sync issue(full version only)

Fix reminder issue

1/7/2019 V3.3.3

Fix issues with reminders. (Please note: Due to the notification changes in Android 8+, you will not be able to assign different ringtones for different chores anymore. The app will use the last ringtone you pick and apply to all reminders.)

9/17/2018 V3.3.2

Fix alarm issue on Android7+

Fix email list issue on Android7+

Add syncing with Google Tasks(beta)

8/16/2018 V3.3.1

Improve "Vacation Mode"

Packing List

3/2/2019 - V4.2.2

Fix auto-sync not showing dialog when opening the app issue

9/19/2018 - V4.2.1

Fix email list issue in Android 7.0+

8/15/2018 - V4.2.0

Add "Invert All"

My Party Planner

4/30/2019 - V2.2.1

Minor bug fix and improvement in Guest View

10/17/2018-V2.2.0

Add the misc tab for decoration or other items

Allow the user to hide unused tabs

Allow the user to add photos to to-do and shopping items